Animations are a great way to level up projects. Great animations can also be used to extend a project to create more realistic looking characters or action sequences. However, there are times when you want to have an animation be the entire focal point of a project.
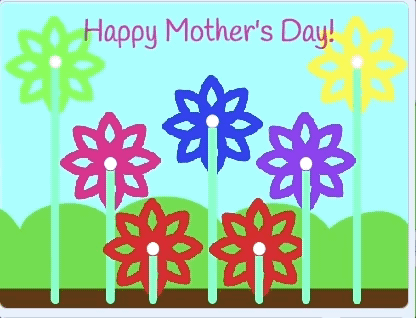
In this tutorial, we will go through how to create a flower animation in Scratch. Estimated tutorial time: 45-60 minutes. Below is a preview of the completed project: Flower Animation
This technology tutorial is a great opportunity for those who are curious in learning how to build with technology to work with the visual based programming language, Scratch, without getting tripped up on syntax and grammar that are typical challenges of text based languages.
There are going to be 3 key parts to this project: button creation, flower petal animation creation, and flower stem animation creation. Once you have a firm understanding of these key parts, you should be able to create multiple flowers that are different colors. For each subsequent flower, try not to just copy and paste the code. But, instead try to get an understanding of what parts of the code you need to change in order to get the desired effect.
1. Button Creation
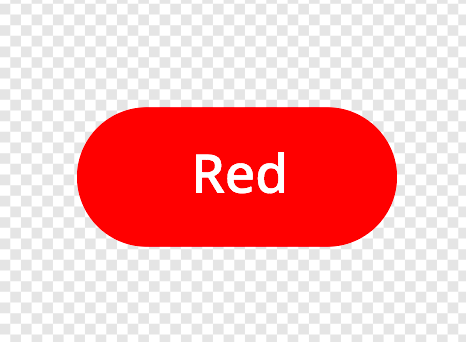
To get started, we need to create a character button that when pressed will start the flower animation. In Scratch, these characters are referred to as Sprites. You can either draw your own character using the paint tool or select from the library of available characters. For this tutorial, I’m going to select the button sprite.Red Button Sprite
Once we have selected the button sprite, we are going to make it the same color as flower. For this button, we are going to make the button color red (color = 0, saturation = 100, brightness = 100). Next, we are going to add the word 'Red' on top of the button so that the user is clear that pressing this button will create a red flower.
Now, we need to create the effect that the button is being pressed. To do this, we are going to duplicate the button by right clicking on it and selecting 'duplicate'. On the duplicated button, we are going to make the color darker red (color = 0, saturation = 76, brightness = 85) so that we can visually see when the button is pressed. Then in the costume tab of the button, we will name the first costume 'Up" and the second costume 'Down'.
From there, we will place our Red button towards the bottom of the screen.
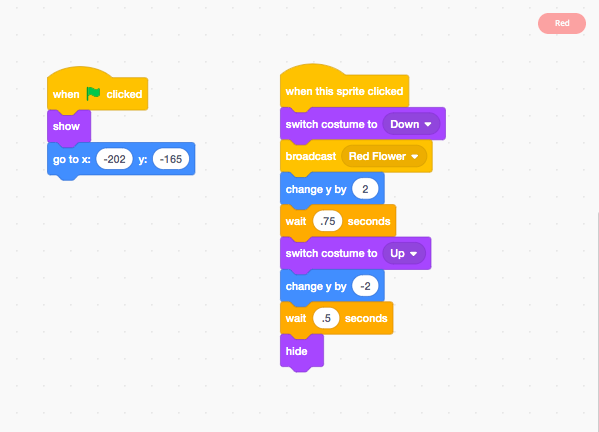
To code the button, we will first get a 'When Green Flag Clicked' from the Events menu. Beneath 'When Green Flag Clicked', we will place a 'Show' block from the Looks menu. After the 'Show' block, we will add a 'Go to X: Y:' button from the Motion menu. If your button was placed correctly, you should not need to change the X: Y: coordinates. For my animation, the X coordinates are -202 and the Y coordinates are -165.
Next, we will create an animation so that we know when the button is pressed. To do this, we will grab a 'When This Sprite Clicked' from Events. Beneath, the 'When This Sprite Clicked', we will add a 'Switch Costume to' block from the Looks menu. In the 'Switch Costume to' drop down, we will select the 'Down' costume. Next, we will send a message to the flower sprite letting it know to begin the animation.
To do this, we will select a 'Broadcast new message' block from Events. We will select new message and type 'Red Flower'. From there, we will select a 'Change Y by 10' block from the Motion menu. Instead of 10, we will change the constant to the number 2 as we just want a slight movement of the button so that the user knows it has been depressed.
Next, we will select a 'Wait 1 second' block from Control. We will change the constant from 1 to 0.75. Then, we will select a 'Switch Costume to' block from the Looks menu. In the 'Switch Costume to' drop down, we will select the 'Up' costume.
Now, we need to move the button back down. To do this, we will select a 'Change Y by 10' block from the Motion menu. Since we initially moved the block up by 2, we will now change the 10 to a -2 so that it goes back down. To make sure there is enough time to see this effect, we will grab a 'Wait 1 Second' block from Control. We will change the 1 to 0.5.
Finally, we will have the button go away after the animation begins. To do this, we will grab a 'Hide' block from the Looks menu.
To make sure that everything is working, press the Green Flag and then click on the Red Button. You should see it slightly change colors and move up/down quickly. If your button is working correctly, great! If not, review the code below to see if you can find your error. Red Button Animation Code
2. Flower Petal Animation
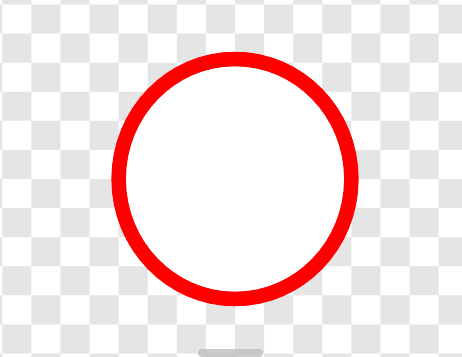
For this part of the project, we are going to create a new sprite that is just going to be a simple colored circle outline with white fill. Then, we are going to animate this circle to create the petal animation. To draw the particle, hover your mouse over the Scratchy the Cat icon in the bottom right hand corner. Then, select the paintbrush tool which will open the drawing window. In the drawing window, select the circle tool. In this step, change the color of the circle outline to red (color = 0, saturation = 100, brightness = 100) and the fill material to white (color = 0, saturation = 0, brightness = 0). Finally, draw a small circle centered over the gray crosshatch on the drawing tool.
Once we have our circle, we are going to utilize the pen drawing tool and mathematics to create our petals. To do this, we first need to add the 'Pen Tool' extension. Go to the bottom of the menu and select the blue = button with a + on top of it. This enables you to select which extensions you would like to add to projects. In this project, we are going to select the 'Pen Tool'. Red Flower Sprite
If this is done correctly, you will se the Pen Tool menu appear beneath the My Blocks menu.
To begin our petal animation, we are going to first select a 'When Green Flag Clicked' block from Events. Beneath 'When Green Flag Clicked', we are going to select a 'Go to X:Y:' block. Let's have this flower start at 0:0.
Since we are going to be drawing on the screen, we always want to make sure that we have removed any leftover drawings. To do this, we select an 'Erase All' block from the Pen Tool menu. To conclude our first block, we are going to select a 'Hide' block from the Looks menu.
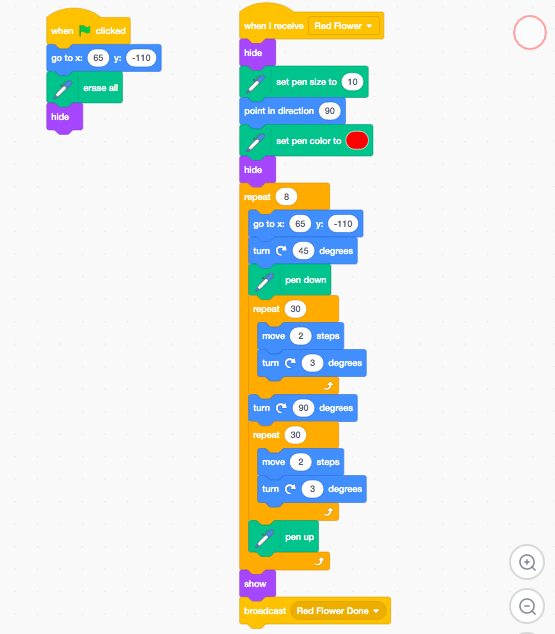
When we created our button, we include a broadcast message 'Red Flower'. Now, we are going to provide the instructions for what we should do with that message.
Let's select a 'When I Receive' from the Events menu. From the 'When I Receive' drop down, let's select 'Red Flower'. Beneath this block, we will place a 'Hide' block from the Looks menu. Next, we need to select our pen size by getting a 'Set Pen Size to 1' from the Pen Tool menu. We will change the 1 to 10 to give us a larger brush for our petals.
Next, we select a 'Point in Direction 90' from the Motion menu. Then, we need to get a 'Set Pen Color to' from the Pen Tool menu. As before, we are going to change the color to red (color = 0, saturation = 100, brightness = 100). The final part of our setup is to get a 'Hide' block from the Looks menu.
Now, we will use mathematics to create our flower petal animation. For this project, we are going to create a flower with 8 petals. To do this, we are going to grab a 'Repeat 10' block from the Control menu. Instead of 10, we are going to change this to the number 8 to represent our 8 petals.
Instead of the 'Repeat 8' block, we are going to always make sure that our pen is centered in the middle of our flower petal. To do this, we will grab a 'Go to X: Y:' block from the Motion menu. As before, we will change the coordinates to 0:0. Next, we will grab a 'Turn 15 degrees' clockwise block from Motion. Instead of 15, we will change this number to 45 degrees. This means that every time we draw the next petal, it will be start 45 degrees away from the prior petal. By the end of the flower, we will have completed an entire circle. Another way to think about this is if you take 360 degrees and divide it by 8, you will get 45 degrees. So, to make sure all our petals are equally spaced, we need to change the starting point by 45 degrees for each new petal.
Immediately after this, we will select 'Pen Down' from the Pen Tool menu.
Now, we need to draw each side of our petal. To do this, we will select another 'Repeat 10' block from the Control menu. We will nest this inside of our 'Repeat 8' block immediately beneath the 'Pen Down' block. Instead of 10, we will change this to constant to 30. Inside of the 'Repeat 30' block, we will place a 'Move 10 steps' block and a 'Turn 15 degrees' clockwise block from the Motion menu. Instead of 10, we will change this constant to 2 steps. And instead of 15, we will change to 3 degrees. This will enable our total angle to equal 90 degrees since we are turning by 3 degrees 30 times. This completes one side of our petal.
To draw the other side of our petal, we first need to select a 'Turn 15 degrees' clockwise from the Motion menu. We will place this block right outside the 'Repeat 30' block but still nested inside the 'Repeat 8' block.
Next, we will need to draw the other side of our petal. This will be exactly the same as the first half of our petal. To do this, we will select another 'Repeat 10' block from the Control menu. We will nest this inside of our 'Repeat 8' block immediately beneath the 'Pen Down' block. Instead of 10, we will change this to constant to 30. Inside of the 'Repeat 30' block, we will place a 'Move 10 steps' block and a 'Turn 15 degrees' clockwise block from the Motion menu. Instead of 10, we will change this constant to 2 steps. And instead of 15, we will change to 3 degrees. This will enable our total angle to equal 90 degrees since we are turning by 3 degrees 30 times. This completes the other side of our petal.
Since both sides of our petals are now drawn, we then need to pick up our pen by selecting the 'Pen Up' tool from the Pen Tool menu.
Now we want the center of our stem to show up. To do this, we will select a 'Show' block from the Looks menu.
Finally, we will broadcast a message that our petals are done and the stem can now be animation. To do this, we will select a 'Broadcast Message' block from the Events menu. We will change the new message to 'Red Flower Done'.
To make sure everything is working, test your code to make sure you get all 8 petals drawn around the origin (0,0). If it isn't working, see if you can find your error. If not, review the code below to see if you can find your error. Red Flower Animation Code
When you are making multiple flowers, you will have to make changes to the origin and the color of the flowers. But, you should be able to re-use much of the code above.
3. Flower Stem Animation
Now that we have completed our button and our petal animations, it's time to create our flower stem.
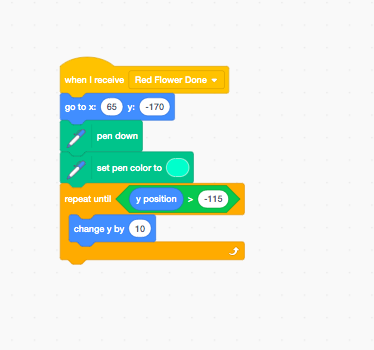
In the prior step, we broadcasted the message 'Red Flower Done'.
Using this message, we will select a 'When I Receive' block from the Events menu. From the dropdown, we will select 'Red Flower Done'.
Beneath this, we will add a 'Go to X: Y:' block from the Motion menu. As before, we will change the coordinates to 0:0.
Next, we will select 'Pen Down' from the Pen Tool menu. As before, we will select a 'Set Pen Color to' from the Pen Tool menu. Our stems will be light blue. Click on the color selection tool and change the values to: color: 46, saturation: 100, brightness: 100.
Our stems will come from the ground and terminate at the center of flower. To achieve this effect, we are going to grab a 'Repeat Until' block from the Control menu. Then we are going to select a 'Greater Than 50' from the Operator menu. Instead of 50, we are going to change this to 0. The condition we need to check for is y position. To do this, we will select a 'Y Position' block from the Motion menu.
Inside of the 'Repeat Until' block, we are going to select a 'Change Y by 10' block from the Motion menu.
To make sure everything is working, test your code to make sure you the stem drawn from ground and terminating at the origin (0,0). If it isn't working, see if you can find your error. If not, review the code below to see if you can find your error. Red Stem Animation Code
Based on what we've done with the flower animation, challenge yourself to make additional flowers. What will you need to change to create a bouquet of different colored flowers?
There are many different elements of well designed projects. From the characters to the backgrounds and everything in between. This tutorial went through how to build a flower animation.
The ability to program many different graphic elements and effects is a foundational skill for enhancing a wide variety of projects using this and many other programming language.
Join our growing community!
Sign up to receive the latest news, special offers, & updates about Digital Adventures.
We respect your privacy and do not tolerate spam. We will never sell, rent or give away your personal information to any third party.
About the Author: Omowale Casselle is the Co-Founder & CEO of Digital Adventures.


 By:
By: