In this tutorial, we will go through how to create different coin animations using Scratch. Estimated tutorial time: 60-75 minutes.Below is a preview of the completed project:
There are going to be 3 key parts to this project: character selection and movement, button selection and movement, and coin selection & movement.
To get started, we need to select a character that we would like to have move. In Scratch, these are referred to as Sprites. You can either draw your own character using the paint tool or select from the library of available characters. For this tutorial, I’m going to select Dot.
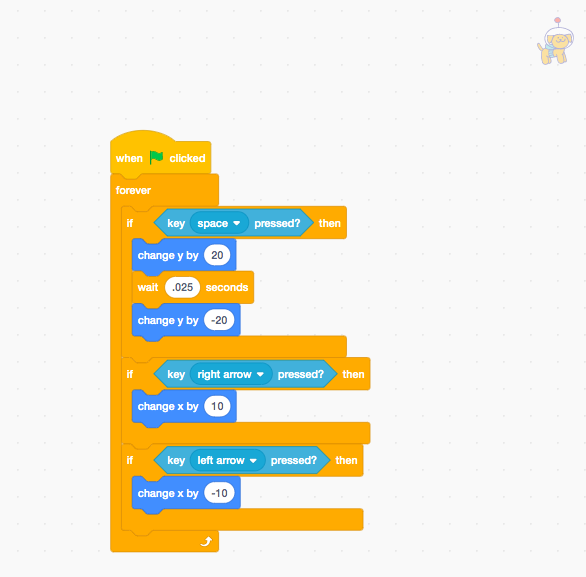
For our character (Dot), we're going to want to press a key that enables Dot to jump into the air so that we can activate the button. As each button is activated, we will earn coins. We also want Dot to be able to move back and forth so that we can earn coins from all 3 available buttons in this project.
Below are the final blocks of code that you should have to control for Dot moving forward, backward & jumping up and down.
Now that we have finalized Dot's movement, we need to have buttons for Dot to jump into that will activate us earning coins. Similar to the selection of Dot, we need to select a button that we would like to have move. In Scratch, these are referred to as Sprites. Let's select the Button 3 from Scratch's built in character library by clicking on the magnifying glass.
Once we have selected the button, we need to program the movement animation. Before we do that, let's place the button above Dot's head so that the space dog can begin earning coins. The expected behavior is that when Dot jumps into the button, it should move up slightly and then return to the initial position. This programming should be very similar to what we did when we programmed Dot to jump in the air and return to the ground.
See if you can build the button animation on your own? What was different about programming Dot's jump vs the button movement?
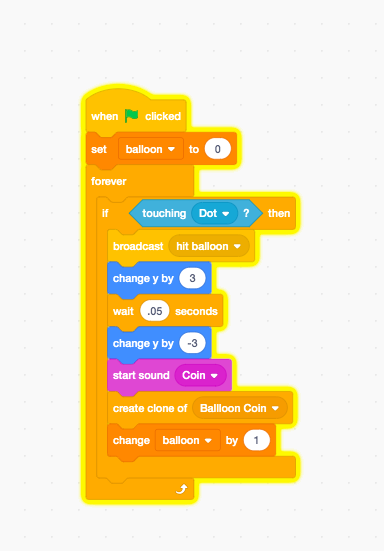
To build this animation, we will begin with a ‘When Green Flag Clicked’ block from Events. Next, we will add a ‘Forever’ block from Control. Inside the ‘Forever’ block, we will add a ‘If Then’ conditional statement from Control. Inside the diamond on the ‘If Then’ conditional statement, we will place a ‘Touching mouse-pointer?’ block from Sensing. Instead of 'Touching mouse-pointer?', we will need to click the down arrow and change this to 'Touching Dot?'. In the area of the conditional statement that doesn’t have a code block, we will add 2 'Change Y by 10" from Motion and 1 'Wait 1 seconds' from Control. The first 'Change Y by 10' will be to control the movement for the button to move up when Dot jumps into it. The second 'Change Y by 10' should be changed to a negative number to have the button return to its initial position. Unlike Dot's movement, we want the button movement to be smaller. So, let's change the 1st Change Y by variable to 3 and the second to -3. So that the movement doesn't appear instantaneous, we will place the 'Wait 1 seconds' block between the two Motion blocks. Since we don't want the jump to take so long, I'd recommend changing the 1 second to 0.05 seconds.
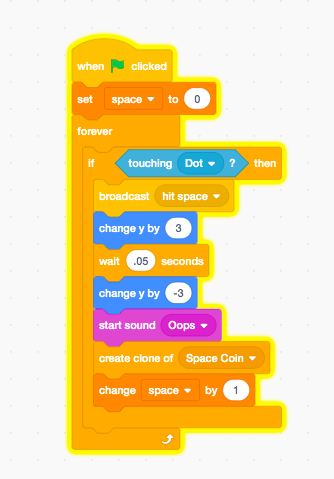
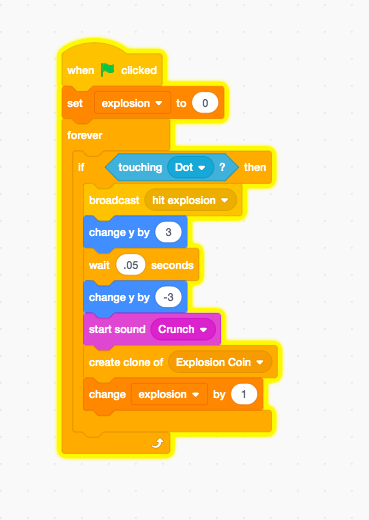
Below are the final blocks of code that you need for the button to be animated. You need to do this for 2 more buttons to make the game interesting for Dot. To accomplish this goal, you can either duplicate the first button you created by right clicking and selecting duplicate. Or, you can build each button from the beginning using the code below.
3. Coin Selection & Movement
Now that we have our character movement and button movement, it's time to start earning some coins! For this part of the project, we are going to build 3 different types of coin collection animations: balloon, space and explosion.
Similar to the selection of Dot and our buttons, we need to select coins that we would like to earn. In Scratch, these characters are referred to as Sprites. Let's select the Button 1 from Scratch's built in character library by clicking on the magnifying glass. After you've selected Button 1, change the name to 'Balloon Coin'.
Now, we need to make some modifications to the Button 3 code that we are going to associate with the Balloon Coin. We need to broadcast a message to the game that says that this Sprite has been hit. Then, we need to create a clone of the coin that we will be animating.
Let's start with the broadcast message. From Events, there is a block that says 'broadcast new message'. Place this block inside the Forever loop for Button 3 right above the 'Change Y by 3'. Next, click on the drop down arrow and change 'new message' to 'hit balloon'. Finally, go into Control and select the 'create clone of myself' block. Instead of 'myself' change the name to 'balloon coin'.
Once that is complete, we can start animating the Balloon Coin. Click on the Balloon Coin from the sprite character selection window. You will know the sprite is collected because it will be outlined in blue.
Next, we need to click on the Code tab in the upper left hand corner. Once in the Code tab, we are going to tell the Balloon Coin what to do when it receives the 'hit balloon' message and what it should do with the clones that are being created.
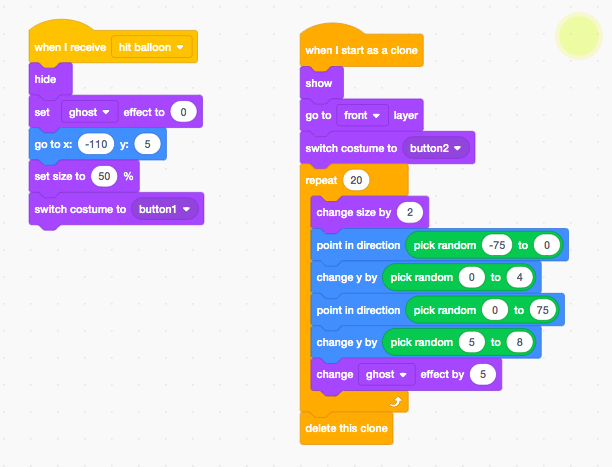
Let's start with the 'hit balloon' message. in Events, we're going to get the block of code that says 'When I receive hit balloon'. This block of code is very similar to the 'When Green Flag clicked' block. Beneath, the 'When I receive hit balloon' block we're going to place some Looks blocks and a Motion block. From the Looks menu, we are going to get a 'Hide', 'set color effect to 0', 'set size to 100%' & 'switch costume to button' blocks. In the Motion menu, we will select a 'go to X: Y:' block. This will enable our coin to always return to the same spot when we reset the game. Place all of these blocks beneath the 'When I receive hit balloon' block. Next, we will change the variables for 'set color effect to 0' to 'set ghost effect to 0' and 'set size to 50%'.
Now, we will build the 'When I start as a clone' code. Since we want this animation to appear as though a balloon is flying away when we earn this coin, we are going to need a few different Looks & Motion blocks. First, we need to have our clone appear. So, we are going to get a 'Show' block from Looks. Next, we need to make sure that our button is on the top layer by getting a 'Go to front layer' block from Looks. Next, we need a 'switch costume to button 2' block that is also in Looks.
Next, we need to have a loop. Instead of the 'forever' loop that we've previously used in this project, we are going to select a 'Repeat 10' loop from Control. Why don't we want a 'forever' loop in this situation?
In essence, we want our coin to perform an animation to the top of the screen and then allow us to earn another coin. If we placed our animation inside a 'forever' loop, it would continue until we stopped the game.
We're going to first change our 'Repeat 10' to a 'Repeat 20' loop. Then, we are going to get a 'change size by' along with a 'change ghost effect by 5' from Looks. Then, we are going to 2 'point in direction 90' and 2 'change y by 10' blocks from Motion. Since, we want to simulate a balloon floating away, we are going to have these blocks be more random. From Operators, we are going to grab 4 'pick random 1 to 10' blocks. Place these blocks inside the 4 motion blocks that we just selected. Next, we are going to place the blocks inside the 'Repeat 20' loop in the following order: 'change size by 2', point in direction [pick random -75 to 0], change y by [pick random 0 to 4], point in direction [pick random 0 to 75], change y by [pick random 5 to 8], and 'change ghost effect by 5'. Finally, outside the 'Repeat 20' loop, we're going to add a 'delete this clone' block from Control.
Let's briefly discuss why we selected the variables above for our animation. Since, we are going through the Motion and Looks blocks 20 times, we want to just change our size by a small amount each time. This means by the end, our balloon coin should be 40% bigger than when we started. Next, because we want our balloon to look like it's flying away we want our angle to be variable. Point in direction can range from -360 to 360. So, we chose a range that would enable our balloon to change direction a few times while it is floating up in the air. And finally, we want our balloon to look like it's becoming more transparent as it gets higher in the sky. This means that if we change the ghost effect by 5, it should completely disappear by the time the animation is complete.
Below is the final code blocks for our ballon coin. See what happens when you change the variables around. Does the behavior change as expected? Which variables have the biggest impact on movement? Which variables have the most impact on the look of the balloon as it floats skyward?
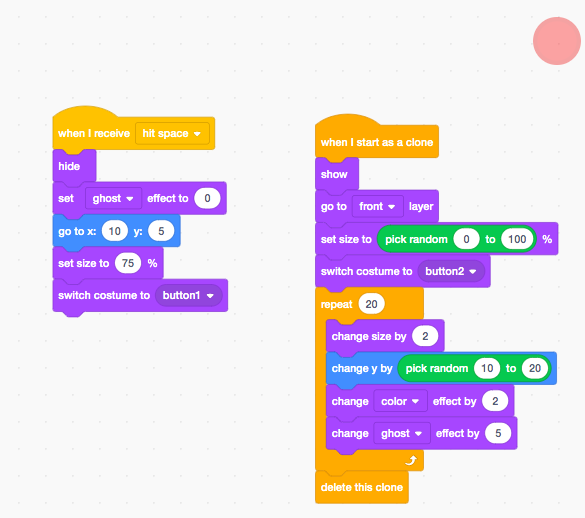
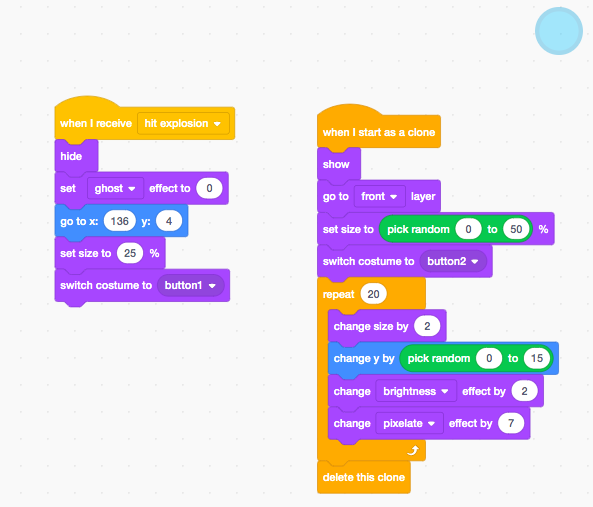
Based on what we've done with the balloon coin, challenge yourself to create a space coin and an explosion coin. What will you need to change to create different animation effects for your coins?
See below for the code blocks for the space coin and animation coin. Is the code what you expected? What is different from what you expected? What other types of coins can you create with the knowledge gained from building these 3 coin animations?
Conclusion
There are many different elements of well designed video games. From the characters to the backgrounds and everything in between. This tutorial went through how to build animations for earning coins while playing a game.
The ability to program many different video game elements is a foundational skills for enhancing a wide variety of projects using this programming language.


 By:
By: