

 By:
By: One of the key skills necessary when building projects is introducing events and actions. One of the most popular types of events is collisions. There are times when you want the character to have a certain behavior when it collides into another character, other times you want the character’s behavior to be based on an interaction with a specific color and other times you want behavior to be based on where the character is physically positioned on the screen.
In this tutorial, we will go through how to create these different events and actions in Scratch.
Scratch is a great platform for both parents and beginners to learn how to build with a visual based programming language without getting tripped up on the syntax and grammar that are typical challenges of text based languages.
To get started, we need to select a character that we would like to have move. In Scratch, characters are referred to as Sprites. You can either draw your own character using the paint tool or select one from the library of available characters. For this tutorial, I’m going to select Scratchy the Cat for my hero character. We will also need a character that will represent the enemy. When Scratchy the Cat crashes into the enemy, the game will be over. For the enemy, I'm going to select the bat from the Scratch character library.
We will also need to have the hero, Scratchy the Cat, be able to move around the screen using the arrow keys. You will also need to have the enemy, the bat, randomly move around the screen to create problems for Scratchy the Cat if not avoided. Using this tutorial, you can learn how to create character controls using Scratch for Scratchy the Cat & the bat.
We will also need to have the hero, Scratchy the Cat, be able to move around the screen using the arrow keys. You will also need to have the enemy, the bat, randomly move around the screen to create problems for Scratchy the Cat if not avoided. Using this tutorial, you can learn how to create character controls using Scratch for Scratchy the Cat & the bat.
Once you have your characters (hero & enemy) selected and have programmed movement (arrow keys & random), you need to switch to the Code tab in Scratch. It is the far left selection at the top of the screen right next to Costumes. We are going to be programming all of our events and actions for our hero character, Scratchy the Cat, in this tab.
1. Character Collision
To build the events and actions for the character collision, we are going to use a loop, conditional statement, and a sensing block to determine whether or not our hero and enemy have interacted.
Enemy Sensing
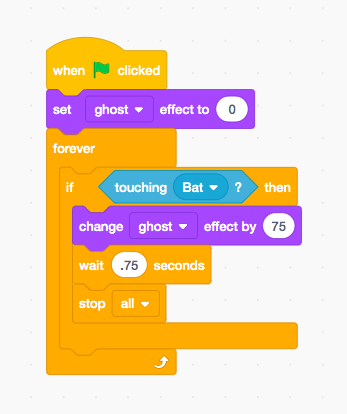
In order to know whether or not our hero and enemy have interacted, we need to create a block of code to determine if this has happened. To build this block of code, we will begin with a ‘When Green Flag Clicked’ block from Events. Next, since we always want to know if this event has happened, we will add a ‘Forever’ loop from Control. Inside the ‘Forever’ loop, we will add a ‘If Then’ conditional statement from Control. Inside the diamond on the ‘If Then’ conditional statement, we will place a ‘Touching mouse-pointer?’ block from Sensing. Instead of ‘mouse-pointer?’, we will change the dropdown to the ‘Bat’.
For this event, our associated action is that we are going to change a visual effect. In the area of the conditional statement that doesn’t have a code block, we will add a ‘Change Color Effect by 0’ from Looks. Instead of 'Color Effect', we will change 'Color Effect' to 'Ghost Effect'. And, we will change the variable from '0' to '75'. You can experiment with this variable until you get the desired hero graphic effect.
Since we are changing the effect in our conditional statement, we must initialize the graphic effect. To do this, we will select a 'Set Color Effect to 0' from Looks. We will once again change 'Color Effect' to Ghost Effect' from the drop down on this code block. Then we will place the 'Set Ghost Effect to 0' between the 'When Green Flag Clicked' and the 'Forever' loop.
Next, we will add a brief delay so that we can see the graphic effect happen. To do this, we will select a 'Wait 1 Seconds' block from Control. Finally, we need to code the final action which is for the game to end once the hero and enemy interact. For this final action, we will select 'Stop All' from Control.
Now if we press the green flag that’s above our project screen (right next to the red stop sign), our block of code for the character collision can be tested.
However, we can’t stop there. All we’ve done by pressing the Green Flag is readied our project for the event & action to occur. Now, you can move your hero around the screen until the enemy collides. Once this occurs, the hero's transparency should increase by the variable you selected above and then the game should stop.
The complete block of code is below.
Congratulations, you’ve built your first event and action in the form of a hero character colliding with an enemy.
The complete block of code is below.
Congratulations, you’ve built your first event and action in the form of a hero character colliding with an enemy.
However, when we build projects, we want our characters to have the ability to simulate other types of events and actions.
2. Color Collision
To build the events and actions for the color collision, we are going to use a loop, conditional statement, and a sensing block to determine whether or not our hero has interacted with a color.
2. Color Collision
To build the events and actions for the color collision, we are going to use a loop, conditional statement, and a sensing block to determine whether or not our hero has interacted with a color.
Color Sensing
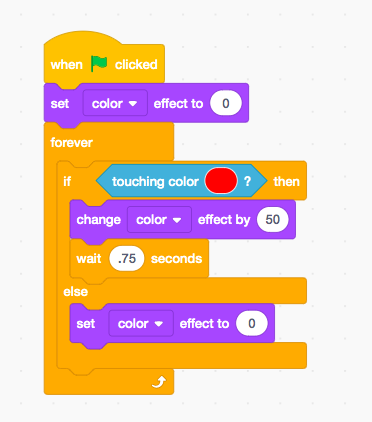
In order to know whether or not our hero has interacted with a color, we need to create a block of code to determine if this has happened. To build this block of code, we will begin with a ‘When Green Flag Clicked’ block from Events. Next, since we always want to know if this event has happened, we will add a ‘Forever’ loop from Control. Inside the ‘Forever’ loop, we will add a ‘If Then Else’ conditional statement from Control. Inside the diamond on the ‘If Then’ portion of the 'If Then Else' conditional statement, we will place a ‘Touching Color?’ block from Sensing. Instead of the default, we will click on the color circle. Once the color selection window opens, we will select the eye dropper tool at the very bottom of the color window. When the eye dropper tool is selected, we will then move the tool over the color that we want to associate with this event & action. For the tutorial project, a red border was created around the screen. Once the eye dropper tool is placed over any portion of the red border, it will change to red. Now, we will be able to sense anytime our character interacts with the color red.
For this event, our associated action is that we are going to change a visual effect. In the 'If Then' area of the 'If Then Else' conditional statement, we will add a ‘Change Color Effect by 0’ from Looks. And, we will change the variable from '0' to '60'. You can experiment with this variable until you get the desired hero graphic effect.
Next, we need to code what should happen to our graphic effect when our hero is not interacting with the color. To do this, we will select a 'Set Color Effect to 0' block. Then we will place this block in the area of the condition statement for 'Else'. This will essentially be our default condition. Whenever, the hero is not touching the color, there will be no change in the color effect.
Since we are changing the effect in our conditional statement, we must initialize the graphic effect. To do this, we will select a 'Set Color Effect to 0' from Looks. Then we will place the 'Set Color Effect to 0' between the 'When Green Flag Clicked' and the 'Forever' loop.
Next, we will add a brief delay so that we can see the graphic effect happen. To do this, we will select a 'Wait 1 Seconds' block from Control. Since this is not intended to be a game ending event, we will have the hero character color return after the 1 second delay.
Now if we press the green flag that’s above our project screen (right next to the red stop sign), our block of code for the character color collision can be tested.
However, we can’t stop there. All we’ve done by pressing the Green Flag is readied our project for the event & action to occur. Now, you can move your hero around the screen until it's touching red. Once this occurs, the hero's color should increase by the variable you selected above.
The complete block of code is below.
The complete block of code is below.
3. Position Collision
To build the events and actions for the position collision, we are going to use a loop, conditional statement, and a sensing block to determine whether or not our hero has navigated to a certain area of the screen.
Position Sensing
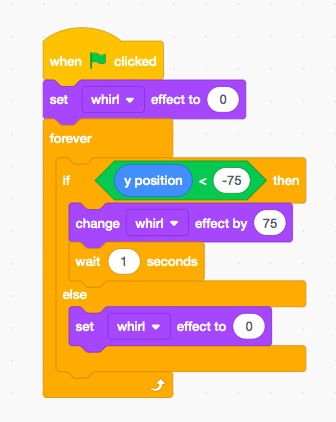
In order to know whether or not our hero has gone to a certain area of the game, we need to create a block of code to determine if this has happened. To build this block of code, we will begin with a ‘When Green Flag Clicked’ block from Events. Next, since we always want to know if this event has happened, we will add a ‘Forever’ loop from Control. Inside the ‘Forever’ loop, we will add a ‘If Then Else’ conditional statement from Control. Inside the diamond on the ‘If Then’ portion of the 'If Then Else' conditional statement, we will place a 'less than 50' inequality block from Operators. Next, we need to determine whether or not we want to track the X position or the Y position of our character. For this tutorial, we want to know whether or not Scratchy the Cat is at the bottom of the screen. So, we need to get a 'Y position' block from Motion and place that in the 1st part of our 'less than 50' inequality block. Since we want to track if Scratchy the Cat goes too low on the screen, I will change the '50' to '-75'.
For this event, our associated action is that we are going to change a visual effect. In the area of the conditional statement for 'If Then', we will add a ‘Change Color Effect by 0’ from Looks. Instead of 'Color Effect', we will change 'Color Effect' to 'Whirl Effect'. And, we will change the variable from '0' to '75'. You can experiment with this variable until you get the desired hero graphic effect.
Next, we need to code what should happen to our graphic effect when our hero is not in a certain portion of the screen. To do this, we will select a 'Set Color Effect to 0' block. Instead of 'Color Effect', we will change 'Color Effect' to 'Whirl Effect'.Then we will place this block in the area of the condition statement for 'else'. This will essentially be our default condition. Whenever the hero is not at the bottom of the screen, there will be no change in the whirl effect.
Since we are changing the effect in our conditional statement, we must initialize the graphic effect. To do this, we will select a 'Set Color Effect to 0' from Looks. Instead of 'Color Effect', we will change 'Color Effect' to 'Whirl Effect'. Then we will place the 'Set Whirl Effect to 0' between the 'When Green Flag Clicked' and the 'Forever' loop.
Next, we will add a brief delay so that we can see the graphic effect happen. To do this, we will select a 'Wait 1 Seconds' block from Control. Since this is not intended to be a game ending event, we will have the hero character whirl effect return after the 1 second delay.
Now if we press the green flag that’s above our project screen (right next to the red stop sign), our block of code for the character position collision can be tested.
However, we can’t stop there. All we’ve done by pressing the Green Flag is readied our project for the event & action to occur. Now, you can move your hero around the screen until it's toward the bottom of the screen. Once this occurs, the hero's whirl effect should increase by the variable you selected above.
The complete block of code is below.
The complete block of code is below.
Conclusion
There are many different ways to create events and actions in Scratch. The ability to program character collisions is a foundational skill for building a wide variety of projects using this programming language.