While we often focus on making sure that we are programming character movement along with the subsequent events and actions to simulate interactive game play, visual effects are also an important element of making great projects. A simple effect that makes your project more realistic will provide more enjoyment to the user and more satisfaction to the developer. Often it can take just as much time to get one of these effects right as it does to program the game events & actions. Visual effects are often a great way to further customize or extend a project.
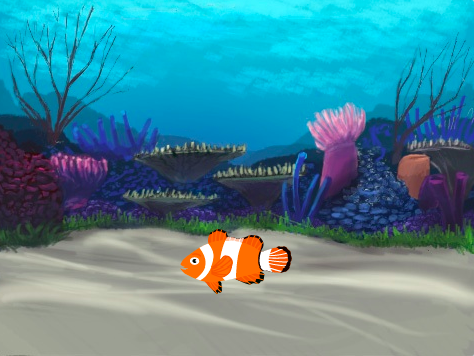
In this tutorial, we will go through how to create a rising bubble effect using animation in Scratch. Estimated tutorial time: 30-45 minutes. Below is a preview of the completed project:
This technology tutorial is a great opportunity for those who are curious in learning how to build with technology to work with a visual based programming language without getting tripped up on syntax and grammar that are typical challenges of text based languages.
There are going to be 3 key parts to this project: object selection (fish), sprite particle creation (parent), and sprite particle animation (child).
1. Object selection (Fish)
To get started, we need to select a character that we would like to have bubbles coming from. In Scratch, these characters are referred to as Sprites. You can either draw your own character using the paint tool or select from the library of available characters. For this tutorial, I’m going to select a fish.
We will not need to add any code to the fish. This is just part of our environment to make our bubbles originate from a more realistic point. You can also select an underwater themed background to make the habitat for the fish more realistic.
2. Sprite particle creation (Parent)
For this part of the project, we are going to create a new sprite that is just going to be a simple circle outline with no fill. Then, we are going to animate this circle to create the bubble effect. To draw the particle, hover your mouse over the Scratchy the Cat icon in the bottom right hand corner. Then, select the paintbrush tool which will open the drawing window. In the drawing window, select the circle tool. In this step, change the color of the circle outline to light blue (color = 49, saturation = 60, brightness = 100). Finally, draw a small circle centered over the gray crosshatch on the drawing tool. This will represent the parent particle whose children are going to be animated in the next step.
3. Sprite particle animation (Child)
Now that we have the baseline sprite particle created, we are going to use blocks of code to animate and create the visual effect of bubble coming from our fish.
In Events, we're going to get the block of code that says 'When Green Flag Clicked'. Beneath, the 'When Green Flag Clicked' block, we want to grab a 'Hide' block from the Looks menu. This will hide the parent particle so that we can create a bunch of clones based on this original design. Next, we are going to grab a 'Forever' loop from the Control menu. Inside of the 'Forever' loop, we are going to add 'Create clone of myself' block from the Control menu. The 'Forever' & 'Create clone of myself' block means that we will create a clone of our parent particle every time the computer cycles. However, we want to slow cloning down a bit. So, we're going to grab a 'Wait 1 second' block from the Control menu. Then we're going to change the 1 to .1 second.
Now that we've got a bunch of child particles, we need to create the visual animation of the bubble effect.
To start, we will get a 'When I start as Clone' block from the Control menu. Then, we will get a 'Show' block from the Looks menu. This enables the child particles to show up on the screen. Now, we need to make sure that the bubbles look like they are coming from the fish. So, we will grab a 'go to mouse-pointer' block from Motion. We will change the drop down from 'mouse-pointer' to 'fish'. Next to make the animation as realistic as possible, we will want the child particles to start at a range of different sizes. So, we will get a 'Set size to 100%' block from the Looks menu. We replace the 100 in the 'Set size to 100%' block, we will place a 'Pick random 1 to 10' block from the Operators menu. to enable a larger variety of child particles, we will change the 1-->20 & the 10--->100. This means that our child particles will randomly clone with a starting size between 20-100% of our parent particle. We also want our particles to appear as though they are originating from different X starting points. To do this, we are going to get a 'Change X by 10' block from Motion. We are going to get a 'pick random 1-10' block from Operators and place it where the 10 is. Then we are going to change the 'pick random 1-10' range from -5 to -10.
Next, we need to have a loop to simulate the movement of rising bubbles for our child particles. Instead of the 'forever' loop that we've previously used in this project, we are going to select a 'Repeat 10' loop from Control. Why don't we want a 'forever' loop in this situation?
In essence, we want our bubbles to perform an animation until it reaches a short distance away from the fish. If we placed our animation inside a 'forever' loop, it would continue until it reaches the top of the screen.
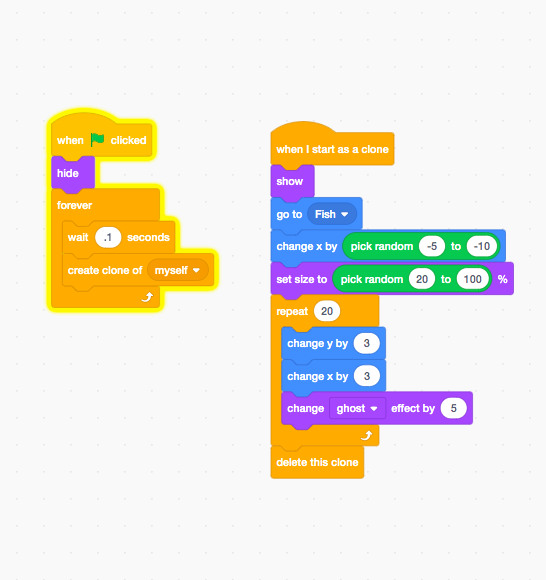
We're going to first change our 'Repeat 10' to a 'Repeat 20' loop. Then, we are going to get a 'change size by' along with a 'change ghost effect by 5' from Looks. Then, we are going to get a 'Change X by 10 ' and 'Change Y by 10' blocks from Motion. Since, we want to simulate bubbles rising a short distance, we are going to have these blocks movements be smaller by changing the 10 to a 3 for both blocks. Next, we are going to place these blocks inside the 'Repeat 20' loop in the following order: 'change Y by 3, 'change X by 3' and 'change ghost effect by 5'. Finally, outside the 'Repeat 20' loop, we're going to add a 'delete this clone' block from Control. This will allow the child particle to delete each time the animated motion is completed.
Let's briefly discuss why we selected the variables above for our animation. Since, we are going through the Motion and Looks blocks 20 times, we want to just change our size by a small amount each time. This means by the end, our bubble particle should be 60 pixels away from our fish in both the X and Y direction. This will create a large smoke cloud coming from our building. Finally, we want our bubble to look like it's becoming more transparent as it gets farther away from the fish. In essence as it gets more diluted with water, the bubble should start to get lighter as it rises in the water. This means that if we change the ghost effect by 5, it should completely disappear by the time the animation is complete.
Below is the final code blocks for our bubble particle. See what happens when you change the variables around. Does the behavior change as expected? Which variables have the biggest impact on movement? Which variables have the most impact on the look of the bubble as it travels upward?
Based on what we've done with the bubble particle, challenge yourself to make other particle based effects. What will you need to change to create different animation effects for a particle? Conclusion
There are many different elements of well designed projects. From the characters to the backgrounds and everything in between. This tutorial went through how to build a simple bubble animation effect that you can incorporate into lots of different projects.
The ability to program many different graphic elements and effects is a foundational skills for enhancing a wide variety of projects using this programming language.
Join our growing community!
Sign up to receive the latest news, special offers, & updates about Digital Adventures.
We respect your privacy and do not tolerate spam. We will never sell, rent or give away your personal information to any third party.
About the Author: Omowale Casselle is the Co-Founder & CEO of Digital Adventures.


 By:
By: